(1).jpg)
How to Rebuild a Top End on a 2-Stroke Dirt Bike

If you own a two-stroke dirt bike, there will come a point where you’re going to need to rebuild the top end of your engine. The goal is to make it part of your scheduled maintenance and not as a result of a mishap that occurred while you’re on the track. Below we detail the 7 steps to rebuild a two-stroke motorcycle.
Two-stroke engines may be simpler and easier, but just like in any other rebuild, it’s going to require a knowledge of how each component works, a systematic approach, attention to detail, and some patience.
We’re going to approach the rebuild of your two-stroke in chronological order to make sure we go through each important step. This guide is not an all-inclusive guide to every step in the rebuild process, these are just the key steps to help you perform the steps simpler and faster.
- Pre-rebuild Preparation
- Disassembling
- Inspection
- Measurement
- Prep Work
- Installation
- Post-build
Pre-rebuild Preparation
Assessment
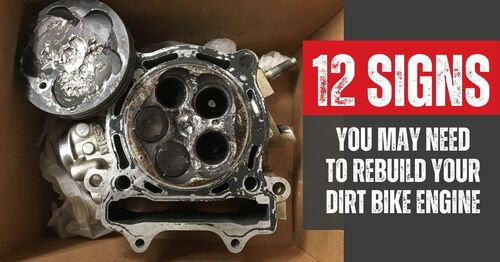
Before you tear down your engine, are there current issues existing? If there are any signs of an issue, it might be good to perform diagnostic tests at this point. If you haven't already, check out the 12 Signs Your Bike Might Need a Rebuild.
Cleaning
You should always take the time to thoroughly clean both your bike and the engine before you pull it apart.
Service Manual
Do you still have your service manual with you? It contains all the information you need about specifications, service limits, measurements and other data that will guide you throughout the process. So, make sure you have your service manual before you start. If you don't have one you should be able to find a digital version online.
Disassembly
Limit contaminants
After you’ve removed the cylinder, make sure to wrap a clean, lint-free cloth on top of the crankcase so that dirt can’t enter. Any dirt or other particles will cause bottom end wear or even a seizure.
.jpg)
Keep a lint-free rag at the top of the crankcase at all times while it is open and exposed to potential contaminants.
Removing the piston
If you’ve got a pick or needle-nose pliers, you can easily remove your piston by inserting the pick into the dimple in the piston, and behind the circlip. Use it as a lever and pry the circlip out partially. Once it’s out partially, grab the circlip using the needle-nose pliers. Be careful and avoid scratching the wrist pin bore. Otherwise, it will make removing the wrist pin much more difficult.
.jpg)
Use tools as needed to aid in circlip removal, but be careful not to mar the pin bore so the wrist pin can be easily removed.
The ease of pin removal will depend on the design of the engine and the condition of the bore. If the pin can be removed using your hand, then that’s perfect. If not, try tapping lightly while supporting the rod. Once you’ve successfully removed the wrist pin, you can then remove the piston from the rod.
Disassembling the power valve
Before you take apart the power valve, be sure to review the service manual first to get yourself familiar with how the components piece together.
Pro tip: When you remove the power valve system, lay the components out on a clean rag in the same order or placement as they are originally installed in the engine. This will remind you of how they should be installed later. Aside from helping you organize, it’s also going to save you time later.
.jpg)
Lay out all the parts of your power valve assembly as you disassemble it. This will help you keep everything organized, and make sure you get it back together correctly.
Another pro tip: When cleaning the components, clean them one at a time and place them back on the rag, so that they don’t get jumbled.
.png)
Online microfiches can be very helpful to double-check reassembly of the power valve. They can be found on many motorcycle dealer websites.
Inspection
There are 5 components that you should inspect the condition of:
- Intake Manifold
- Exhaust Flange
- Reed Valve
- Rod Small End
- Power Valve Components
1. Intake Manifold
Inspect the intake manifold for any cracks. This is more common in older engines, and once these cracks reach through the manifold, they can lead to air leaks, which we want to avoid.
2. Exhaust Flange
What you should look for in the exhaust flange is any sign that it’s excessively worn, as this may make exhaust gas sealing much more difficult, hamper performance and cause leakage.
3. Reed Valve
When checking the reed valves, be sure to check the condition of the reed valve petals, cage, and any stopper plates. You can find the acceptable clearance between the petal tips and cage, and the stopper plate height, in most of the service manuals.
.jpg)
Inspect all reed valves components thoroughly before reassembling the top end. Any parts showing signs of excessive wear or damage should be replaced.
4. Rod Small End
You should check the surface of the small end rod bore for defects like pitting, scratches, and marring. If these defects exist and are severe, you may need to replace your connecting rod. Any damage to the inside surface of the rod’s small end could affect the small end bearing as well, which could lead to a chain of the top-end problem and potential failure. A great option when replacing a bottom end is either a bottom end kit or a complete rebuild kit.
.jpg)
The rod small end is a critical point of inspection. Any damage to the inside surface could affect the small end bearing, leading to a chain of top end problems and potential failure.
5. Power Valve Components
Lastly, you should check the components of your power valve for any signs of significant wear. This might occur over time and can lead to performance losses.
Reassembling with new components
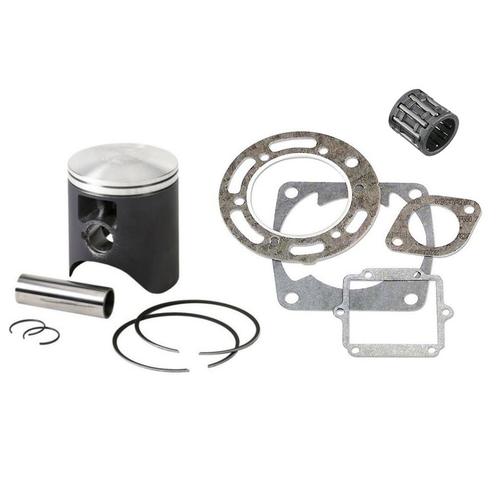
If you’re planning to freshen up your two-stroke, Vertex do a quality top end rebuild kit that includes all the parts you will need. If you need a cylinder Athena do a great kit for some models. Otherwise your local engineering shop should be able to assist with checking your bore and replating or re-boring (if necessary). If your bore is glazed, a simple deglazing can be accomplished with a Scotch-Brite pad, just be sure to retain the 45-degree honing mark angle.
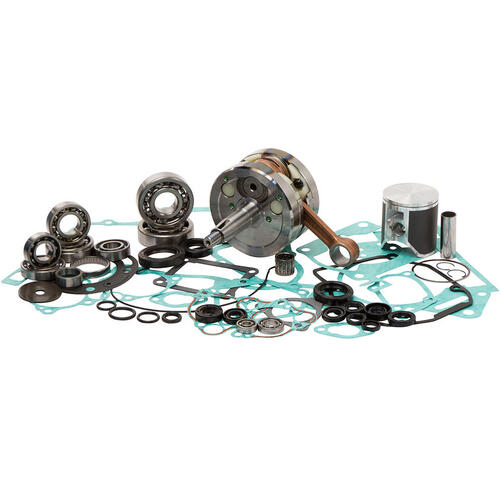
There are several popular choices for new pistons that you can choose from like Pro-X, Vertex and Wiseco. The great thing about these brands is they come as a piston kit which includes rings, circlips and gudgeon pin. To complete the rebuild you will also need gaskets. Aftermarket gasket kits are a great option as they will save you money compared to OEM and they are available as either a complete kit or a top end gasket kit. If you choose OEM they are typically a lot more expensive and every individual part must be ordered separately, including the piston, ring, pin, clips, gaskets, etc. If you are doing a full rebuild the cheapest option is to get a complete package like these awesome kits from Wrench Rabbit.
Measurements
Listed below are the measurements that you should routinely make when you rebuild a two-stroke top end:
- Piston ring end gaps
- Piston-to-cylinder clearance
- Rod small end diameter
Out of all these measurements, confirming or adjusting the ring end gaps is the most important thing to do (note: most rings are already gapped correctly if part of a piston or top end kit), followed by ensuring that the cylinder bore’s diameter, shape, and straightness are within its spec. If you don’t have the right equipment for measuring, you can ask for help from your local motorcycle workshop to assist you.
.jpg)
Measuring piston-to-cylinder clearance is a smart precaution to help ensure you won't run into any unexpected issues with your new top end.
1. Ring End Gaps
You can check the ring end gaps by installing the ring in the bore without the piston and using a feeler gauge to find the measurement. The appropriate ring end gap can be found in the instructions that come with your new piston.
2. Piston-to-Cylinder Clearance
Before the final assembly, be sure to check the piston-to-cylinder measurement. You can do this by using a bore gauge and a set of calipers to measure the size of the bore. Then, with a set of micrometers, measure the piston. Subtract the piston size measurement from the bore size to get the piston-to-cylinder clearance.
3. Rod Small End Diameter
Measuring the diameter of the rod’s small end can be done using the same method as the bore diameter. This is important because once these get worn out, they can create a free play for the small-end bearing that could result in damage to the bearing and the entire top-end. And we don’t want that. Once measured, compare that with the range indicated in your manual.
.jpg)
Making sure the diameter of the small end of the rod is within spec is often overlooked, but can prevent a serious top end failure.
Prep Work
Cylinder Cleaning
Once you’ve deglazed the cylinder, or it has been newly replated, it should be cleaned one last time because there might be some leftover honing grit. You can clean the cylinder by using warm soapy water and a bristle brush, and then use automatic transmission fluid or any similar cleaning solution with a brush or lint-free rag.
.jpg)
A clean, de-glazed, and properly honed cylinder is key to piston and ring function and longevity.
Pro tip: To ensure the cleanliness of the cylinder, you can use a cotton swab around the bore and look for any contaminants. Do another round of cleaning until no contaminants stick to the cotton swab. Any remaining honing grit will cause premature wear of your piston rings.
Power Valve Function
If cylinders have been replaced or replated, the power valve systems should be reinstalled before the final installation. That’s because excess plating can compromise the movement of the power valve. To correct this, you should carefully remove any excess plating. And on the cylinders utilising blade-style power valves, the position of the blade should be checked to ensure that the blade does not protrude into the bore.
.jpg)
Assemble the power valve before installing the new piston and reinstalling the cylinder. Be sure to check that the power valve is moving as it should, and not protruding into the bore.
Piston
The easiest way to prepare a new piston is by installing the circlips and the ring pack ahead of joining it to the connecting rod. If the service manual specifies which circlip should be installed first, then follow that order. Otherwise, choose the easiest orientation for you, depending on your dominant hand and orientation preference.
.jpg)
It's easier to install one clip and the piston ring(s) before fixing the new piston to the connecting rod.
Pro tip: You can temporarily put the wrist pin in and use it as a backstop so that the circlip is going to be forced to move into its groove. We recommend you install the circlip with the use of your hands, to lessen the chances of any deformation.
For the correct orientation of the circlip, check your service manual.
Position the circlip to the desired orientation, then push the open ends of the circlip into position first. Try not to scratch or mar the wrist pin bore during the process. After installing, use a pick or a screwdriver to confirm if the circlip is well seated and is not rotating. If they are rotating, replace them. That means they’ve been deformed during the installation process.
Pro tip: Make sure to note the orientation of each clip after you have installed them. Some manuals may recommend specific positions depending on the piston, but always be sure the gap is not lined up with or near the dimple(s).
Rings
The compression ring will be directional, and the top of the ring is usually denoted by the markings near the end gaps. You can apply a thin coat of oil to the ring, then move the ring into position carefully, making sure that the ring end gaps are lined up with the locating pin in each ring groove.
Installation
Piston
The arrow imprinted on top of the piston indicated the exhaust side. If you’re not confident about the proper orientation of the arrow and piston, you can always check your service manual for reference.
Apply a small amount of assembly lube to the small end bearing and wrist pin bore, then proceed with installing the bearing. Align the piston with the small end of the rod, and then slide the wrist pin into its proper place. Once again, use the wrist pin temporarily as a backstop, then install the remaining circlip into its position. You can use a pick or a screwdriver to confirm if it’s fully seated and does not rotate.
.jpg)
Don't forget to apply some assembly lube to the ring and piston skirts before assembly!
Cylinder to Piston
In most cases, you won’t need a ring compressor to compress the rings and install the piston into the cylinder. Lightly put oil on the cylinder bore using the assembly lube or engine oil, then lube the piston skirt and ring faces.
.jpg)
Once the new piston is installed on the connecting rod, apply some assembly lube to the cylinder wall, and carefully slide the cylinder over the piston. Squeeze the ring with your hand as you slide the cylinder on, simultaneously making sure the ring end gap remains aligned with the locating pin.
Before you install the piston and rings, check for the last time if the piston ring ends are properly oriented to their actual locating pins.
Position the piston near or at TDC (top dead centre) and then lower the cylinder bore onto the piston carefully. You can make use of your fingers to compress the rings and ensure the cylinder bore fits perfectly to the piston. You will feel how easily the cylinder will slide over the piston and rings. If the installation goes smoothly with little to no resistance, that’s when you know you’re on the right path. If you feel any resistance, stop immediately and assess the ring pack. Look for any rings that may have come out of position in its groove and snagged the cylinder bore. Don’t panic, it happens. This usually occurs when the ring transitions out of your fingers and into the cylinder bore.
Pro tip: Don’t forget to torque your cylinder and head nuts to the specification dictated on your service manual.
Post-Build
Torquing
As we mentioned above, your cylinder and head nuts should be torqued to the specifications your service manual mentioned. This is the perfect time to double-check all the nuts if they’re set at their corresponding specifications.
Spark Plug
You will also need to install a new spark plug in your two-stroke and, if necessary, gap it appropriately.
Air Filter
Before start up, install a clean air filter as well.
Crankcase Leak Down Test
A crankcase leak down test is essential as it helps confirm if all the seals, gaskets, and joints are sealed properly.
Break-in
Now that you’ve got your new top end, it’s time for a break-in. Keep the engine slightly above idle, with slow and mild revs until the engine gets too hot to touch. After that, turn the engine off and let it cool down. When it has cooled enough to touch but still warm, do it again.
Rev slightly higher this time and let the engine get hotter. Turn off, cool down, and do it again, rev slightly higher than the last time and the engine a bit hotter too. After 3 cycles of doing this, let the engine completely cool, then check all your fluids and re-check the torque on your cylinder and head bolts.
A good benchmark for the 3 cycles would be 5 minutes, and then 10 minutes, and then 15 minutes, making sure that the engine cools down enough in between. This ensures that your piston rings are evenly and properly broken in. After a complete cooldown, double-check your fluids and torque once again.
If you need any other parts for your rebuild, check out our full range here.
If you also have a 4-stroke, then you might find our other how-to article helpful: How to Rebuild a Top End on a 4-Stroke Dirt Bike.
** Source:
“How to Rebuild the Top End in your Two-Stroke”, Pro-X Blog